If you are a furniture flipper, I bet you have now, or have had in the past, an unwanted hutch top sitting around doing nothing. I had one. I can't remember what I did with it. All I know is that it was in our garage, and now it's not. I think my husband had something to do with it's disappearance, but he hasn't copped to it yet.
(This pic has nothing but the title in common with this blog post. And that hutch doesn't look like that anymore either. Apologies to long time readers who have seen this feeble attempt of humor through pictures before.)
Anyway, today's flip. The hutch part I'm talking about looks like this. It would sit on a base. Many times, people just want the base and have no idea what to do with the top part. Well, here is a spectacular idea that will make you weep for days at the loss of all of those hutch tops you (or your spouse) may have tossed.
Let's talk about Julie from Simple Redesigns. I adore Julie. I check out her website for her work and follow her Facebook page. I have to dole out my compliments to her projects a little at a time, so she doesn't get a restraining order against me. A makeover of hers will pop up in my newsfeed and sometimes I make sure I'm NOT the first one to like it. Haha. Then after the appropriate time has passed I come back to it, like, comment and dream that I own that piece. Like today's. Julie took this hutch top and transformed it. It's new purpose was going to be as a sink base in a bathroom makeover. Julie added mirror to the doors to hide the plumbing and whatever other bathroom necessities would be stored there. Then she painted it in a pretty color.
After her part was finished, she handed it off to her friend Mindi of MindiFreng Designs. From there, Mindi's plumber took over and finished its conversion into a bathroom vanity. Look at it now!
Isn't that something else? Doesn't that make you want to run out and find a hutch top to convert? It does me! If you find one send it my way! I DISLIKE my bathroom vanity and would be in bathroom heaven to have a piece like this!
Now check out the one that Julie did for her own 1/2 bathroom.
Julie has excellent taste! You seriously need to go check out her work. She very generously shared, too, the recent remodel/reno she and her husband did on their own Mid Century Modern house. Gorgeous is the only way to describe it. We've seen Julie's Simple Redesign work here before on the blog. I have a tendency to pigeonhole Julie into the "furniture into bathroom vanity" category and that's just ME. Because of MY obsession with furniture being turned into bathroom vanities and my hatred of my own traditional bathroom vanity. Actually, those conversions make up a very small part of her vast repertoire of furniture flips. Once you go on her website or Facebook page, you'll be inspired for days.
Head on over to Simple Redesign's website. There you will find finished pieces available for purchase, unfinished pieces available for you to you request your own look to it, and much more. Julie & Simple Redesigns are located in Grand Rapids, Michigan. Head on over to her Facebook page, too. Let her know you saw her on Furniture Flippin'. I'll be over there lurking. Hehehehe...
Keep up the fabulous work Julie!
That concludes another week of Furniture Flippin'. We shall take a break for the weekend! Woohoo! See you next week!
I'm tired just looking at today's flip but, I'm totally inspired, too! You'll see what I mean in just a second. Let's say you have an entire dining room set. Six chairs, a table and a humongous hutch. If you are me, it would take you a YEAR to get it done. I didn't even have the chairs or table to do, but just a hutch and a buffet and it took me that long, however, I'm not Stacy from Diamond In The Rough. The safe bet is this: If you are looking for a furniture flipper to revamp your dining room set and you only have me or Stacy to choose from - PICK STACY!!! Here's the set her client commissioned her to makeover.
Stacy's client received this set from someone in her family and it had been in storage. They had recently moved and decided to get it painted and finally use it.
Stacy likes to paint in CeCe Caldwell's Paint, Websters or MMS Milk Paint (she's a Dealer for all three - visit her online store to purchase some for yourself.)
One of the reasons she loves those products is because she HATES sanding and priming. In this case, though since it was a dining table Stacy took the extra steps. Knowing the use this set would get, she wouldn't recommend sealing
with wax. She chose to antique it with a stain.
Stacy sanded, primed with oil based primer and painted 2 coats in Behr
"Antique White". She then broke out the sander and sanding paper and
distressed it. She antiqued it with Minwax Stain "Early American" and sealed with
CeCe Caldwell's Satin. She did 6 coats on the top of the table for EXTRA
protection since her client has kids but only did 2 on the chairs.
Stacy's awesome mother-in-law reupholstered the chairs. Look at how fantastic they look all lined up in a row...
Makes you tired just looking at them, doesn't it? When I ask our Furniture Flippers what they don't like to work on - the #1 answer is chairs.
After the work on the chairs & table was complete, Stacy moved onto the hutch. She did the same treatment to it which also turned out completely awesome.
Stacy was excited to get started on the hutch and skipped taping off the glass, figuring she would deal with any paint mishaps on the glass later. BIG MISTAKE she said. It took forever to get that paint off of the glass. Save yourself that energy and tape it off she says.
Look at the closeup of the detailing now...
Stick around...I have some bonus pictures coming towards the end of this post. Get your "pin" button trigger finger ready, readers. Diamond In The Rough is located in Brookhaven, Mississippi. You can follow along with Stacy on her Diamond In The Rough Facebook page. Let her know you saw her on Furniture Flippin'. She's my former "cellmate" from last year when I was in Facebook Jail.
Stacy's writes, "My customer and her husband were so happy with their set and that is what is
all about! Making pieces pretty again and making people happy make me
HAPPY!"
Look at how lovely the completed set looks in it's new home sweet home...
Let's do a side by side comparison of the before & after...
Huge difference! Thanks so much Stacy for sharing your awesome Furniture Flip! Dear readers, get your flip in! What are you waiting for? Here's your invitation. Email me before/after pics & a ton of details to furnitureflippin@yahoo.com .
Oh, Melissa of Twice Loved Gems! How I do get a kick out of you. Let me tell you a little bit about Melissa. She is all about the follow through. I think it's been twice now that she has shared "What Would You Do?" pictures with us on our Furniture Flippin' Facebook page and with each one she turns it into something fantastic. We're doing a follow up on one of those today. Remember this one?
First though, I must share with you a picture Melissa took of her furniture stash. You know what that is! You've got one, I've got one, and check out the one Melissa has. This was snapped the day she was trying to get organized.
What must her neighbors think? Hehehehe...I'm thinking of my own garage. When I was doing the Park Ridge Project I had the furniture for it all set up in my garage and a young lad of 5 years old walked in, took a look around and proclaimed, "This is a nice house!". Then another time, a friend of my neighbor's strolled over looking for her. I was busy working on a garage full of furniture. I offered this stranger my phone to call the neighbor and made chit chat with her while she was waiting for her to pick up. Once my neighbor answered the phone, the woman said, "Hey, where are you? I'm at your neighbor's house and she is trying to sell me some furniture!". I never did close a sale that day. Drats! Anyway, if your garage looks like Melissa's, then take solace in the fact that you are perfectly normal. Just like me & Melissa. Okay, today's flip. Your color suggestions for this hutch ranged from light cream and grays, to red. Quite a few of you suggested red. What bold and daring people you are!
Melissa writes, "We
got to work removing all the wooden and metal hardware. Disassembled
the glass and what ever those cross bar things are. Sanded, filled,
fixed, sanded some more. Primed, sanded blah, blah, blah. You know the
drill. After that we painted on a color called Sliced Cucumber. I love a
top that can be stained so we went with one of my favorites, Jacobean. I
couldn't decide on what to do with the openings on top so I tried my
hand (for the first time ever) at chicken wire. Well, let me tell you
it's not easy and you get scraped up. Not a fan." Melissa then antique glazed it with two different specialty finishes, Black Coffee and
Cast Bronze from "good old Martha". She used a wipe on poly seal. Melissa purchased some
gorgeous new hardware to finish it off.
"The top is smooth like butta,
storage is amazing and I am a proud momma", writes Melissa.
Beautiful! Thanks so much Melissa for sharing with us your "What Would You Do?" pic and the completed piece!
That brings to a close another week of Furniture Flippin'. Five more pieces of furniture saved from certain doom. There's still time to get your flips in before the turn of the century. Whatcha waiting for? Here's your invitation! Email me at furnitureflippin@yahoo.com . In the meantime, talk back! There's a comment section right below to accommodate witty banter.
I get so excited by the furniture makeovers that I get
to feature here. Not only by the remarkable transformations the pieces
undergo, but by the talented and lovely people I get to "meet". Every
so often I get to feature a furniture artist from another country. I
find it so interesting the differences in our languages. A few times
I've had to "Google" a word that I've never heard before. (I learned
one from today's flipper that I'll use in the next paragraph.) I also
was told a short time ago by a different furniture flipper I featured
that I taught her via this blog the word flippin' in regards to furniture and she uses it all the time now. (Yay! Totally cool!)
Today I am chuffed to introduce you to Gemma of Mariposas Painted Furniture.
She is located in the village of Middle Rasen just north of the
historic city of Lincoln in the United Kingdom and we are going to take a
look at the tranformation of this Erco Dresser. I'm going to let Gemma
take it from here...
Gemma wrote, "I'd been living in Madrid for two years prior to
coming home and starting my new venture. I did a course in porcelain
painting while I was over there, as I love to paint. I couldn't find a similar course back here in Lincoln so I eventually
stumbled across an Autentico Paint workshop and loved the idea of
painting furniture. I had the most awesome day and got totally addicted.
This Ercol dresser
was one of a few items I got at a local auction (the first time I'd gone
to an auction and bid). I loved the experience. I'd heard about Ercol
and discovered it was one of the best quality furniture manufacturers
in the UK. This one was from their old colonial collection, very dark
stain to emulate the trend in the 17th century. Their new pieces sell
for thousands and this vintage piece was made of solid elm. I got to work on it straight away using the Autentico color "Linen" in
their Vintage range, which is the range made for furniture painting. The
colour looked breath-taking, I painted the top (or hutch) first, while my
husband stripped the work top taking the old dark stain off and revealing
the beautiful natural colour and grain of the wood.
After I'd painted
with four coats, I lightly distressed before I waxed and then put three
coats of Autentico clear wax on. It was a long process as each layer has
to be totally dry. We then used danish oil for the work top giving that
about three coats. We added some new felt to the removable cutlery drawer
and that was all done."
~ ~ ~
Stephanie
again! Isn't that a gorgeous piece of furniture? The details on it
before just seemed lost to me in that sea of dark dark wood. Now, they
really stand out. I love it.
This piece sold rather quickly. Gemma wrote, "My customer traveled up from South Wales to
collect (a fair trek) as she said there's not much choice for painted
furniture where she lived."
You can follow along with Gemma on her Mariposas Painted Furniture Facebook page.
There you can see more of her stunning work. Let her know you saw her
on Furniture Flippin'. If you live in the UK, you can see the items she
currently has for sale in her Mariposas Painted Furniture Etsy shop. Check it out. You might find something you can't live without. Thanks so much Gemma for sharing your amazing furniture flip! (And for teaching me the word "chuffed".) Dear readers, if you think you've seen this flip before it's because I'm running another rerun. Call it a midwinter's break. Although at this rate, I'm beginning to think winter will never be over. I will be back with new flips. It may be tomorrow or it may be next week. I'm kind of enjoying the break. Now that I've said that, let me say this. I know a lot of you come to the blog through Facebook and I really do appreciate your interaction with me on our Furniture Flippin' Facebook page.
I encourage you to leave comments here on the blog as well. If you
haven't subscribed to the blog yet, please do so. Facebook is getting
wackier and wackier when it comes to pages and newsfeeds. So, if you
want to be sure and not miss a flip, then you better not count on
Facebook.
Come back tomorrow for another amazing furniture flip!
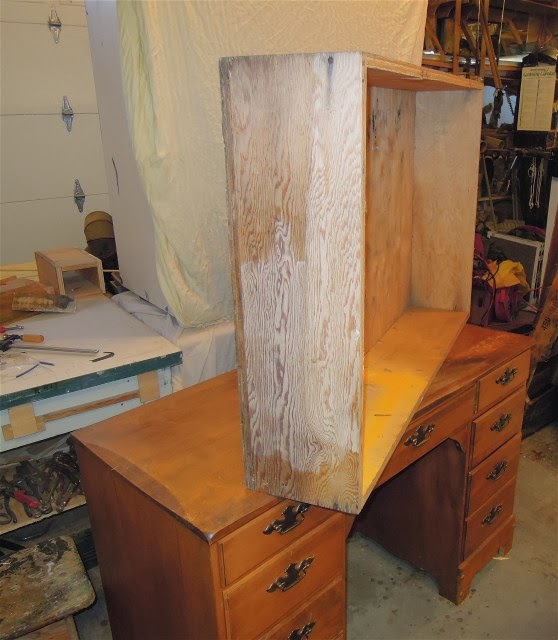
Sometimes you just have to change directions and find a new purpose in life, right? That's what Darren of Austin Farmhouse Furniture thought when he came across this Cherry Writing Desk. He felt this desk could use a life change and he was just the man to make that happen. This desk coupled with a plywood box that Darren retrieved from a dumpster were about to become an awesome new Hutch.
After removing the lower 6 drawers from the desk, Darren built fixed
shelving and started to glue together solid fir doors for the Buffet. He
cut up a cedar kick to join the two sides together.
In the hutch section, he added some dowels for a cookbook section and fixed a
shelf above that. Once the top was added to the hutch he installed the beadboard to the back of the case. Then it was onto the finishing touches. He applied a coat of primer and then a "Flax
Wax" wash with CIL paint.
Let's take a look at the incredible after of this project...
Isn't that amazing? I could see that used in a variety of rooms. In the kitchen that big lower open space could hold a Kitchen Aid mixer if you are lucky enough to have one. (I'm hoping I get one next year for Christmas - Tell Triple H, will ya?) Then there is plenty of room for cookbooks and other kitchen goodies. OR, you could use it as a credenza in a home office.
Any way you want to use it, you might be interested in knowing it's for sale. That's right. You can contact Darren on his Austin Farmhouse Furniture Facebook page for more information. Located in Victoria, British Columbia, they make custom made handcrafted one of a kind furniture using upcycled, repurposed and salvaged materials. They'll work with you and help your furniture ideas become a reality. Head on over to their Austin Farmhouse Furniture Facebook page and see what else Darren is doing. Let him know you saw him on Furniture Flippin'.
Thanks Darren for sharing your fantastic furniture flip!
Dear readers, don't forget your witty comments are always welcome here on the blog. It gives me something to read, too. So, get a typin' or I'll put a change jar up and make you donate to my "Buy Stephanie A Kitchen Aid Mixer Next Year For Christmas" fund.
...I sit down to write my blog post, trying to block out the fact that with the windchill the temperature outside is -34 degrees. The telephone rings and breaks my concentration. When I am interrupted it takes me a while to catch my train of thought. I turn to my little 5 year old friend Emily, who I am entertaining today because they have canceled school, and I whine about my lack of concentration. (It really is more about me and my nonstop wandering brain than it is about any outside interruptions. I. Can't. Focus.) Emily approaches my desk and I show her the before picture of today's furniture flip. (Emily helped me choose it today.) Emily says, "Just say that I like it, I love it and it's cute, pretty and fancy."
Emily is right. She has excellent taste. So, here we are. We are going to travel to Rutland, England today. There it feels 84 degrees warmer and we'll find a talented duo who wears paint jeans that look like this...
Meet Laura and Jack from Reloved Vintage. Laura and Jack wrote, "Our lovely
client, Hannah-Marie, had followed our Facebook page for a while, and
came to us in search of a bureau for her snug. As it happened, we had
two unpainted bureaus in stock, a smaller one and then this piece, which
had extra shelving on top. Hannah-Marie decided this option would
provide her with more storage, and opted to have an inventive
colour-scheme of cream on the outside with vibrant raspberry pink inside
- and what an inspired choice it proved to be!"
Jack and Laura stripped the
old finish, and removed the broken trim on the glass section, before priming
the piece inside and out. Then they applied three thin coats of paint and two
coats of protective matte varnish. They lightly distressed the finish to highlight
the beautiful character of the desk, and lined its drawers with an elegant
Laura Ashley coordinating paper.
Now, I have no idea what a "snug*" is and we usually refer to this piece as a Secretary Desk in the U.S., but there is one thing that is not lost in translation. This is GORGEOUS. Take a look at it now...
As Emily said, "I like it, I love it and it's cute, pretty and fancy." Job well done!
You can find more examples of the beautiful work Laura and Jack do on their Reloved Vintage website. You can also follow along on their adventures (they are a fun couple) on their Reloved Vintage Blog or their Reloved Vintage Facebook page. Let them know you saw them on Furniture Flippin'.
*I Googled "snug" but didn't want to act like I knew what it meant in case I still used the word wrong. So, I'm telling you - I'm not completely sure. It could be a very small private room in a pub. Or not.
Thanks so much Laura and Jack for sharing your spectacular Secretary Desk aka Bureau. I like it, I love it and it's cute, pretty and fancy.
Dear readers, I want you to email me some pictures of furniture that you don't know how you want to re-do. Here's the deal: you send me the picture to furnitureflippin@yahoo.com and admit you have a problem. Admitting it is the first step in furniture recovery. Then, I'll show it to my Furniture Flippin' Facebook friends. They'll all pony up their ideas. You consider their ideas and either use one of them, or venture out and do your own thang. Finally, you email me the after pics and share what you did. Pretty simple. Get on that, okay?
See you tomorrow from the soon to be thawing frozen tundra that is the Midwest...
Today's flip has been a long time in the making. It's one of our own. I acquired our dining room furniture from my maternal grandmother Avery. She and my grandfather J.D. purchased it new shortly after they were married in 1938. By the time I got it, grandma had done some flippin' of her own to it. In 1968, she had my Uncle Larry apply a faux woodgrain finish to the table, hutch and buffet. The hutch and buffet are a matched set. However, the table that now shares the room with them, didn't originally belong with them.
The original matching table was damaged in a fire in 1944. During that period of time, my grandparents lived above their grocery store in downtown Crestview, Florida. My mother Annette was a few years old. One night my mom woke up her mom (Grandma) to take her to the bathroom. As she entered the hallway in that upstairs apartment my mom pointed out smoke coming in under the door from the store below. Grandma hurriedly woke up Grandpa and visiting sister-in-law Effie. Grandpa ran to a window and yelled to some airmen heading to the bus station on their way back to Eglin Air Force Base. The men noticed the fire in the store below and ran to assist them. The family climbed out onto the porch roof and the servicemen helped them down to safety. The family was safe and everything else that was lost could be replaced. The dining room set survived. The table had damage to it. Grandma kept the hutch and buffet, but gave the table and chairs to her parents (my great grandparents) who repaired it and kept it for their own use.
Flash forward to 1955. My grandmother relocated to Illinois with her husband and family. The table stayed in Florida, the hutch and buffet came with them. Grandma located a Tiger Oak table to purchase. She bought it from a farmer who had it stored in a barn. Here's a picture of my grandma that year with the table. Funny story about that picture...it was staged. My grandmother wanted to send pictures of their new home in Illinois back to her relatives in Florida. So, she dressed up, pretended she was setting the table for a party and had my mom snap that picture. (The apple which is me did not fall far from that tree.)
The beautiful woodgrain on that table was covered in that same faux finish. Ugh. I know. What was she thinking? Well, at that time it was all the rage to faux finish furniture. (Sound familiar Furniture Flippers?) In the late 1990's, I paid someone to strip the table and chairs back to the beautiful wood. The hutch and buffet's time didn't come until this year. (We knew those two pieces weren't gorgeous Tiger Oak. We learned during this makeover, they were built with whatever wood the builder had on hand.) I really began the makeover on them the week of Thanksgiving 2012. I painted the hutch and didn't like how it was looking. I stopped midway through and decided to strip it and the buffet. Well, if you know me, and I think you might, you won't be surprised that I quickly became bored with it. They were pushed aside for cooler projects. Like the Pottery Barn Inspired Entertainment Center and the Dumpster Dresser. Then the Park Ridge Project. The Lion's Head buffet. The Bird Dresser. The Chair from Hell makeover. And the Triple Rocker. Plus, a myriad of home improvement projects. Patiently they waited. Finally we got to them. We had a deadline of Thanksgiving 2013. We did not meet that deadline. While it may seem that I was purposely avoiding these two pieces, I assure you there was a reason. My grandmother had "flipped" them and that makeover lasted for 45 years. She had no way of knowing then that so many decades later her granddaughter would be "flipping" them again. I, however, imagine that in 40 years my future grandchild will be making them over again. And I wanted to make sure she (or he) didn't call into question what her (or his) grandma and grandpa was thinking when they did this flip. So, I took my time deciding how I wanted them to look. Triple H was on me the whole time, telling me we had to get them done. Finally, I decided I wanted to repurpose the beadboard that we had from our last 100+ year old cabinet. You might recall we had two of those cabinets. They originally were owned by my stepdad's aunt. We worked one of them into our kitchen makeover.
We took apart that cabinet. Discovering that the wood used for it was purchased locally. In very old fashioned handwritten penmanship is written "J.C. Ames Lumber Co." They were well known in my town beginning in 1868. They closed in 1987.
It has since been torn down. I always loved that building. This building was built in 1923. I'm not sure what the original building looked like.
We then set to work sanding and sanding and sanding and sanding. Then repairing the repairwork on the buffet that I would guess my Uncle Larry might have performed.
Along the way we found some fingerprints that must have belonged to the original builder of the buffet. We kept those. They are still inside the buffet.
We removed the shelves so they could be sanded and stained.
Triple H was a super smartie when it came time to sand the original knobs.
I worked hard trying to match the stain to the century old finish on the beadboard. I even turned to my carpenter friends for their opinions on the finish. We then set about prettying it all up and pulling it all together. Paint, paint, paint. Stain, stain, stain. Finish, finish, finish. Once that was done, then it was onto the beadboard.
Finally, the end of this makeover was in sight. We cut the beadboard down to size and attached it.
We also replaced the wood backing on each piece.
Then it was picture taking time...
The buffet looks beautiful with its stained top and knobs against the black.
My china pops against the old beadboard. I love that such an old cabinet was able to be incorporated into this piece. It gives it another layer of history to the hutch. As if surviving a fire and making the trek from Florida to Illinois wasn't enough of a history for it.
I really love that wood/paint combination. I like to move my furniture around from room to room, so it'll look just as nice in the kitchen as it does the dining room. I wish I could show you a good picture of all of the pieces (the hutch, buffet and table/chairs) inside of the house. However my house with all of its windows and bad lighting just doesn't do them justice. Here is a picture of the table waiting for them to return. The poor table was without his partners for over a year. So, there you have it. The cobbler's kids finally have shoes! I really love my dining room furniture. I look at those pieces and I see so many memories when I look at them. My grandmother had a beautiful home in a small town 12 miles from where I live now. Her dining room was my favorite room. She & I had a special relationship. She was my runnin' buddy. We'd get into all kinds of mischief together. I think that she would be proud of how we are taking care of her furniture. That's it for today's flip. It was a long read, I know. So, if you didn't read it word for word, I won't hold it against you. It was more of a way for me to chronicle this for the next generation of my family.
I would like to add that the next time you find yourself participating in the "great paint debate", think of this flip. Think of how my grandmother applied a faux finish over beautiful Tiger Oak. Then recall that I stripped it off to reveal that woodgrain again. What is painted can be stripped. Or if you feel like painting over wood, do it. You do what you want to the furniture that you own. This is the last flip for this year. I'm taking the rest of the year off and will return on Thursday, January 2, 2014. Thank you all so much for being a part of Furniture Flippin' this year. It has been an incredibly fun experience for me. I've met a lot of wonderful people along the way and have been inspired by all of you.


 Anyway, today's flip. The hutch part I'm talking about looks like this. It would sit on a base. Many times, people just want the base and have no idea what to do with the top part. Well, here is a spectacular idea that will make you weep for days at the loss of all of those hutch tops you (or your spouse) may have tossed.

 Now check out the one that Julie did for her own 1/2 bathroom.