Showing posts with label Steff's Stuff. Show all posts

Wednesday, March 18, 2015

Here's The Story Behind The Coolest Chicago Cubs Dresser Of All Time...

It was October 25, 2013 and I was driving home from grocery shopping because that is what cool people do on a Friday night.  I was within three blocks of our home when I spotted this dresser on its back in a front yard.  It had yellow Post-It notes stuck to its parts indicating that all of the pieces were there.  I was so excited to find this that if I knew how to do a cartwheel I would have.  (Somebody needs to teach me to do a cartwheel.)  I made my son help me drag it into the back of the Durango and I drove it home.  You can only imagine the excitement I felt for this found piece of roadside rubbish.  Well, I will confess that my handsome handy husband did not share my enthusiasm.   

While I envisioned what could be, Mr. Level Headed saw the work it would take.  More precisely, the work it would take HIM to rebuild it before I even got my hands on it.  He was right.  I knew he was right.  However, I have a soft spot for discarded pieces and what they could become.  I also knew he would come around.  I was right.  He did.   

At the time I had no idea that this dresser would become THE centerpiece in our first grandchild's nursery.  We didn't even know that our first grandchild was on his way.  Yet.  When the good news was shared, we stepped up and offered to furnish his nursery.  On a budget.  We always tackle each project we take on very frugally.  Just like when we did the Park Ridge Project.  Baby's Mommy decided on a Chicago Cubs Baseball theme for his nursery.  
 
Triple H rebuilt the drawers.  After that, I started stripping the layers and layers of paint this dresser had accumulated over the years.  I think I counted five or six.  Thank goodness for Citristrip.  


Once we had it down to bare wood, Triple H went to work rebuilding the interior of the dresser.  


We decided to paint the dresser using Clark & Kensington's Chocolate Covered Cherry.  We had previously used that color in our RV's bathroom and fell in love with it.  Seriously, I could sit in that bathroom all day if it wasn't the size of a phone booth.  I love the color THAT MUCH.  

I knew we wanted to do the Cubs logo on the dresser and had originally entertained the idea of having the image on the FRONT of the dresser.  (That would have been cool looking!) Once it was stripped though and the wood was revealed, I knew that wouldn't work.  There were too many variations in the type of wood used.  So, that plan was scrapped and we decided to have it on the wood top.  I found the logo online (it was a coloring page) and printed out the size that I wanted. Then I traced it on lightly with a pencil.  I darkened this photo so you can see it, but trust me, it was lightly drawn on there.

Then I gathered my stains and paintbrushes.  Yes, I stained the logo on.  I used Dark Walnut, Red Chestnut and Light Oak.  I didn't tape off the area.  Knowing how stain likes to bleed, I was very careful, took my time and stayed within the lines.  After that was dry, I stained the rest of the top with the Light Oak.  Then it was polyurethaned a couple of times. 

I found some awesome baseball knobs online at Hobby Lobby.  I needed 16 of them and waited until they were 50% off.  

Meanwhile, we were simultaneously working on the rest of the furniture for the room.  

We took an old rocking chair we owned, repaired the rush seat on it, and painted it to match the dresser.  We gave a spruce up to a baseball themed table we found at a local secondhand store.  The lamp was bought new online.


I made some artwork in the form of a baseball and glove print that I manipulated on the computer to look like a painting, uploaded it to Walgreens, had it printed and I framed it.  

I bought some paper lanterns at the store and with the help of red & black craft paint, I turned them into hanging baseballs to suspend from the corner of his room.  If I ever make these again, I think I'll use red & black Sharpies instead of paint.


I made a giant ruler to hang on his wall so his growth could be recorded.  I created the numbers on the computer and printed them out the size I wanted.  Then I traced them on and filled them in with a black Sharpie.


One of my favorite pieces in the room is this fantastic artwork
showcasing his name.  I made that, too. I created it on the computer and had to have it printed professionally online due to it's size.  It measures 6" x 41".  Triple H made the frame for it. 
It was featured in my daughter's pregnancy photo shoot by my awesome photographer friend Flo.  It now hangs above Presley's crib.

Speaking of his crib, it needed some baseball themed bedding and there was not anything available online that we liked.  So, I tackled that, too.  I found the fabric online and made him his own custom bedding, including quilt, bedskirt and bumper pads.  That was the first time I had EVER made a quilt.  It was fun and most importantly, it didn't fall apart in the wash!  Hahaha...
 
We had leftover fabric and I made valances for his nursery windows.  (Don't lecture us on the bumper pads.  We've read all of the pros and cons on them.)

At long last, the dresser and everything for the nursery was finished and ready to be delivered to their house.  The baby's delivery was still a few weeks away.    

Triple H installed new flooring in the nursery.  It looks like wood but it's easy to care for vinyl flooring.  It's actually the same flooring we installed in our RV.  I highly recommend it!

Let's take a look at what we accomplished...


What is our FAVORITE part of the nursery?  That's a no-brainer.  It's the little guy who occupies it.  Even if he turns out NOT to like baseball, I think he'll still love his room. 

He doesn't look like this picture anymore.  

His Grandma Steffie took so long to write this blog post featuring his nursery that now he looks like this...


Next up on our flippin' horizon is this piece I got for FREE.  
There you have it.  The story behind the "Coolest Chicago Cubs Dresser Of All Time."  (Hehehehe...at least that's what I call it. )  If you have any questions about any of the projects in this post, please email or catch me on our Furniture Flippin' Facebook page.  I'll be happy to go over any of the steps I glossed over here.  (We would be here forever if I covered every step in this one post.) 

Here's an interesting little tidbit about this nursery:  this is the second time I have decorated this room in anticipation for a firstborn son's arrival.  The first time I was the Mommy to be and it was for my own firstborn son.  Back then this room was decorated in blue hearts and fuzzy brown teddy bears.  Other than the decor, the furniture (crib, dresser, rocker, table & lamp) was all placed in the same exact position it is this time around.  The house we used to live in is now my daughters.  Just a little bit of trivia for ya!
~ Stephanie

Thursday, July 10, 2014

The Triple Rocker Epilogue

You remember our Triple Rocker that my handsome handy husband and I made?  Well, it's stylin' now!  It's all decked out.  If you aren't familiar with it, let's take a look back at what became one of our most popular projects here at Furniture Flippin'.  The bulk of this post dates back to September 2013 when we first showed it to you.

One neighbor's trash...is OUR TRIPLE ROCKER!!  Thank you little J & S for prompting your parents to upgrade your sleeping situation to a set of bunkbeds.  First of all, I was a child at one time, too.  (If you ask my handsome handy husband (Triple H) he will tell you I still act like a child from time to time.  It's part of my charm, I tell him!) And as a child, I shared a set of bunkbeds with my little brother Michael.
 
Yes, my dad frequently called me Stevie Joe until his boy was born.  As the only male child with three older sisters, it was Michael's duty to torment us (me).  I being the closest in age to him became his victim/best friend.  I recall one morning waking up in my bottom bunk to find a fake plastic vampire bat hanging from his top bunk right in my face.  Good times!  Good times!  So, bunkbeds and siblings are a right of passage.  Have fun with them neighbor boys while WE (Triple H & I) have fun sitting on our front porch rocking the night away in our triple rocker made from your old discarded bed.

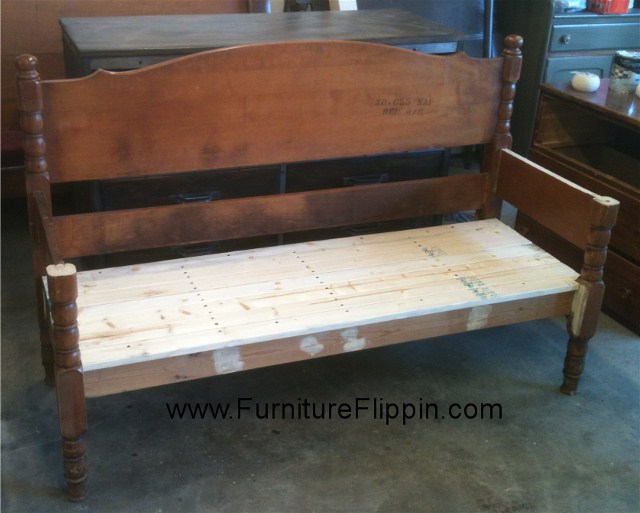
We spotted the bed about a year ago, I'd guess, in the neighbor's trash.  A quick call confirmed it was free for the taking.  So, we grabbed it.  It silently stood in our garage until this summer when it's number was called and work began on it's transformation.
We used the headboard in it's entirety. 


The footboard, however, was cut and became the sides of the triple rocker.  Not in half, mind you, because that would have made for too deep of a rocker. The newel posts on the footboard were removed and saved for another project down the road. We framed the rocker with wood we had salvaged from an old project.
 
There's the framing in of the seat.  Look at our Heavy Metal Industrial Entertainment Center peeking out behind it!  (Buy me for your Man Cave!  I'm one of a kind!)


At this point we started discussing options for the armrests.  That's when I remembered my little $3 table I had picked up when shopping for The Park Ridge Project.  It was a short table at 17".  Not really a practical height for a table if you ask me.  Weird really.  I suggested we use the table top for the armrests.  

Those table legs we saved for another project some day.  Or a sword fight among kids would be fun, too!  Always use your imagination people.  

After cutting the armrests, I sanded and stained them while handsome handy husband made the rockers...
Putty was used to fill in the areas where the headboard originally attached to the side rails.  The chair went up on the lift and the rockers were applied.  

Then of course we had to test it out and it rocked!  (We still see you peeking out from behind there you awesome head bangin' former dumpster dresser!  We love and adore you.)
Now that the construction was pretty much completed, it was time for yours truly to do the finishing work - painting & staining.  Fun, fun!  

While the bed was made from Maple, the table top turned armrests were Hickory.  I couldn't paint over that beautiful woodgrain, and as I mentioned above they were stained.  The rest was all painted black from our paint stash.  Then distressed and stained with an aged oak gel stain from our stain stash.

As is our way, whether it is a remodeling project or a furniture project, we ALWAYS sign our work.  I hope I'm a ghost one day (in a 100 years would work) and can see the reaction of the future occupants of our home when they find all of the little notes hidden inside the walls of this old house.  Then once they discover them, I'll jump out and yell "BOO!".  

I tend to leave longer notes if it's for the house's future owners or ourselves.  I wouldn't normally leave such a long note on a furniture project to sell.  This rocker is a keeper, thus the wordiness hidden under the seat.  

That was it.  After all of that work our neighbor's former bed was turned into our Triple Rocker.  Here she is in all her glory...

Some close-ups...
We love this rocker.  We imagine rocking many a night away in it.  Let's take one more look and then that's the last you'll hear from us on this until we make the next one.  

If YOU have a furniture flip you'd like to share with our readers, please feel free to email before & after pics with all of the details to me at furnitureflippin@yahoo.com .  If you have any questions on any of the flips we feature here, also don't hesitate to email us.  If it's not one of our flips, we'll put you in touch with the ones who did flip it.  

Finally, if you haven't subscribed yet by email to the blog, do so today!  We'd hate for you to miss out on all the cool furniture flips we share.  Only a small fraction are ours, the rest all belong to YOU talented people.  Thanks for coming along with us on this fun project.  Furniture Flippin' Facebook friends were treated to updates along the way.  We appreciated your support and encouragement throughout this Triple Rocker Project.  

Oh, handsome handy husband - YOU ROCK!  Without your carpentry skills this would just be a bed taking up space in the garage.  

UPDATE - July 2014 - Okay let me just tell you this...the Triple Rocker is totally awesome.  We love it madly.  However, it was totally uncomfortable.  Was being the operative word.  No longer though!  Thanks to our dear friend Elly of Elly's Custom Upholstery (located in Green Cove Springs, Florida) it is now all dressed up with a custom cushion and matching pillows.  I selected the indoor/outdoor fabric from swatches that Elly carries and she created this beautiful cushion.  Now it's comfortable to sit and rock on.  Check it out...

Isn't it gorgeous?  I can't wait to sit out there on my porch and wave at all of the speeders and people who drive by while talking on their cell phones.  I'll have a better view of them now, seeing how the cushion is 3" thick and Triple H also shortened our too-tall front porch railing by a few inches.  I may even be able to get license plate numbers now!  Hehehehe...have you made YOUR Triple Rocker yet?  Send me a picture of it if you have!

Stephanie

Saturday, April 19, 2014

Happy 1st Birthday Furniture Flippin'!

Oh, little blog what a fun year it has been with you.  Who'd a thunk that out of a bored Midwest Farmer's daughter-in-law's need to be creative and do something that didn't require her to come up with a DIY project. Every.  Single.  Day.  You would be the result.  (WHO ARE THOSE PEOPLE THAT CAN DO THAT?!?  CRAZY OVERACHIEVING BLOGGERS!  YOU'RE MAKING THE REST OF US LOOK LAZY!!)   

I tried to be a DIY blogger.  One who could be inspiring and show you neat projects and share yummy recipes.  That's not me.  No siree Bob!  Don't get me wrong.  I have my moments.  My moments when I'll be crafty.  Or do something cool.  Or bake something really good.  Who could forget my upcycled change vessel?  

Or my creative tip for dealing with leftover Thanksgiving mashed potatoes?  

In the end, it was my love of furniture combined with my love of writing combined with my tendency to be a slacker who doesn't mind others doing the lion's share of the work that all added up to become you - Furniture Flippin'.  

Through you FF I have met very talented Furniture Flippers and wonderful readers whom I adore.  (FF reminds me of Farrah Fawcett.  Which reminds me that my stepdad nicknamed me Farrah because I wore my hair like hers.  Which makes me think of the day Farrah passed away and how she was upstaged by the fact that Michael Jackson died a few hours later and the news all focused on him instead of our Charlie's Angel.)     

On this blog, I am able to whip up stories that may have something to do with the flip I'm showing our readers and may not have anything at all to do with the flip I'm showing our readers.  I can ramble and weave a story into the mix and our readers hang right in there with me, encouraging me every step of the way because they know how ones mind can work.  We're all more alike than we are different.  Plus, they all have a wonderful sense of humor.  I like that about them.  Furniture Flippin' has the BEST readers.  EVER.  

I think of this blog as my 50 Shades of Grey Trilogy minus the smut and the movie spin-off and the millions of dollars that Trilogy generated in income.  Although, I have used chains before on a flip.  (Why can grey be spelled grEy and grAy?  Always throws me when someone paints a piece grey or when I'm posting about Grey's Anatomy.)  (Great!  Now Michael Jackson's "Beat It" is in my head.  Can't he let ANYONE have their own day?)  (Because of the chain pic not the Grey's reference - perv.)

Some of the people who are out on the WORLD WIDE WEB and find themselves on this blog may not read the stories but just like to check out the flips and that's okay, too.  I want them to be inspired by the furniture.  I want them to want to go out and save a piece of furniture.  I want to show everyone THEIR FLIP when they are done so that people can see HOW FABULOUSLY TALENTED THEY ARE.  
 
(Gosh!  How this blogger rambles.  She sure is long winded.  I feel sorry for her poor husband if she talks that much in real life.  How come we never see a picture of her husband?)

Lest a reader has just stumbled on to this blog today for the very first time and is getting the impression that I only write and don't actually DO any Furniture Flippin' of my own, well, they'd be wrong.  Check out Steff's Stuff.  In the past year, my handsome handy husband & I have created two entertainment consoles, a triple rocking chair, furnished an apartment on the cheap, among other projects.  We are currently deep into flippin' furniture for the first member of the next generation of our family which I'll show you when it's complete.  (You can see snippets of our progress via our Facebook page.  When Steffie is working you can guarantee she'll take frequent breaks and bombard you with pics on there.)  

There is something you should know about this day, April 19th.  I chose this day one year ago to begin the blog for a reason.  It is my dad's birthday.  I felt that choosing his birthday would be good luck for the blog.  I was correct. 

Happy Birthday Dad!  You would be 74 today.  I wish you were here.  I'd make you a German Chocolate cake if you were.  I hope your party in Heaven today is a fun one!  If Farrah shows up, know that I arranged that.  Rebecca & Lee Ann had nothing to do with it.  (Hehehehe...) You are greatly missed and deeply loved Dad.  Tell my brother I miss him and give him a big hug from me.  

There you have it!  Furniture Flippin' - Happy 1st Birthday!  Here's to many more.  Here's to all of the fabulous flips we will see in the next year of your existence.  Here's to all of the phenomenal Furniture Flippers who are always on the lookout for their next flip and whose cars sit outside because they can't fit in the garage due to the stockpile of furniture.  Here's to all of our wonderful readers who make this blog so much fun. 
Thank you.
~ Stephanie